


User Manual for 10W PA Wireless video data RC link Vcan1818
wireless video link 用户手册
Table of contents
3.1. Air system installation 8
3.1.4. Connect flight controller (remote control and data transmission) 10
3.2. Ground end module installation 10
3.2.1. antenna installation 10
3.2.2. power supply installation 11
4.5. Downlink mode configuration 22
4.6. Data transmission settings 24
4.7. Remote control protocol setting 24
4.8. frequency configuration 25
5.1. Detailed system application 31
5.2. remote control function 31
5.2.1. FRSKY remote control configuration 32
5.2.2. Futaba remote control configuration 32
6.2. Remote control channel and remote control 35
6.5. Device binding operation 38
6.6. Computer Windows Firewall 39
6.7. Computer IP address setting 40
6.8. Definition of data transmission and remote control interface 42
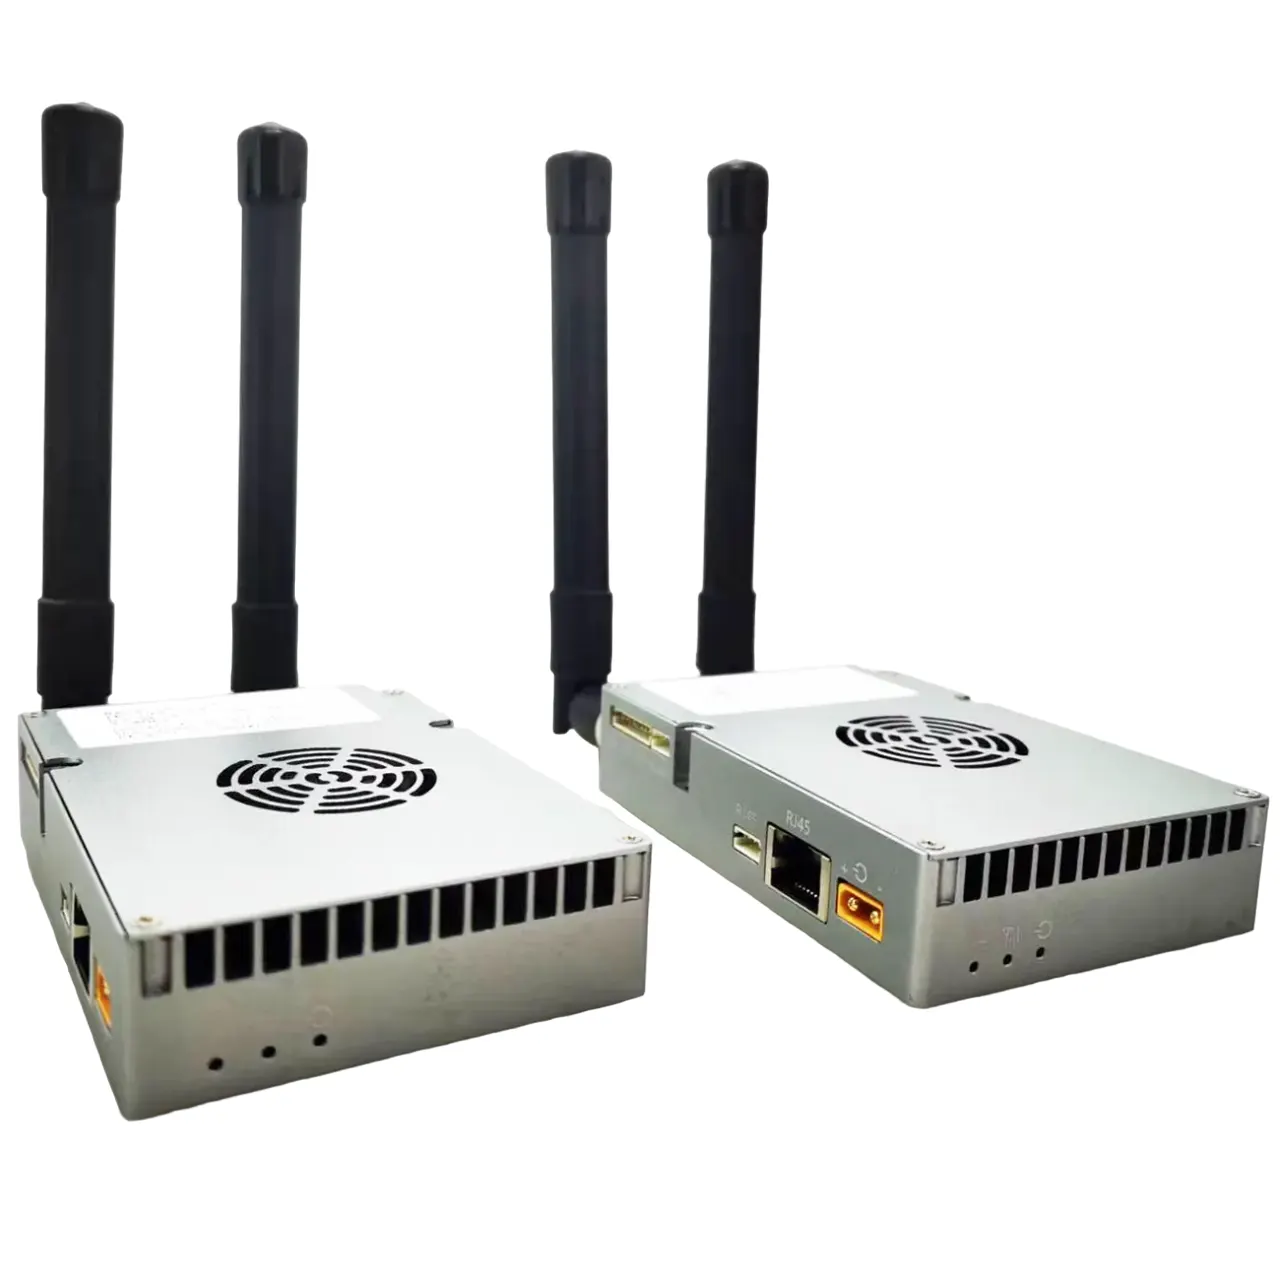
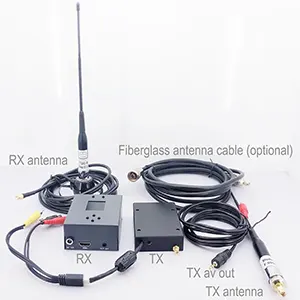
Packing Item Details
Air end & Ground end


天线 & Feeder for Air Unit× 2


(Air terminal antenna)


(Air terminal feeder)
Ground end antenna & feeder ×2
(ground terminal antenna)


(The ground end feeder is used when connecting a high-gain N-head antenna)
Air end cable


| 没有. | 接口 |
| 1,2,3 | RJ45 Ethernet port, connected to the network camera, video input to the air terminal. |
| 4,5 | S.BUS interface, as shown in the figure above, the first core of the DuPont head from the left is the S.BUS signal, and the third core is the ground. |
| 6,7 | The digital transmission serial port is located as shown in the figure above. From the left, the second core of the GH1.25 connector is for receiving, the third is for sending, and the sixth is for grounding. There are two TTL signals by default, RS232 and RS422 are optional. |
| 8 | PPM interface, as shown in the figure above, the first core of the DuPont head from the left is the PPM signal, and the third core is the ground. |
| 9 | 电源, DC18~26V power supply |
Ground cable


| 没有. | 接口 |
| 1,2,3 | RJ45 Ethernet port, connected to the ground station, video output to the ground station. |
| 4,5 | S.BUS interface, as shown in the figure above, from the left, the first core of DuPont head is S.BUS signal, the second core is 5V power supply, and the third core is grounding. |
| 6,7 | Serial port to USB interface, default TTL to USB. Connect to ground station. |
| 8 | PPM interface |
| 9 | 电源, DC18~26V power supply |
- 产品描述
- 技术参数
| 范围 | index |
| 工作频率 | 1370~1450MHz |
| 带宽 | 10兆赫 |
| 最大发射能量 | 40dBm的 |
| 调制 | OFDM |
| 星座 | BPSK、QPSK、16QAM |
| FEC | 低密度脂蛋白 (1/2、2/3、3/4、5/6) |
| 双工模式 | 时分双工 |
| 下行吞吐量 | 2Mbps-8Mbps |
| 上行吞吐量 | 400kbps的 |
| 加密 | 系统启动后自动检测 |
| 接口 | 以太网端口, 串行端口 (UART), PPM/S.BUS |
| 能量消耗 | 38W¯¯ (air end)/16W¯¯ (ground end) |
| 尺寸 | 176*139.3*27.8毫米 (air terminal & ground terminal) |
| 重量 | 668G |
| 额定电压/电流 | DC24V/1.2A (或6S锂电池) |
| 工作温度 | -30°C ~55°C |
| 天线 | omnidirectional, sectoral |
- Air port


- J30J interface
Connect the provided air end cable to the J30J-37 pin interface to realize power supply, 图像传输, data transmission and remote control functions.
- USB接口
USB Type-C interface, connect this interface to the ground station through a USB data cable, and run the wireless video link device management client.


- LED status indicator
The LED light is always on, indicating that the uplink is connected, and very bright, indicating that the uplink is not connected normally (this function is invalid for the air terminal). The positions shown in the figure, 从左到右, are the power indicator (1), the Ethernet connection indicator (2~4), and the uplink and downlink status indicators (5~6).
- bind button
Long press the button to put the device into the binding state. The device has been bound before leaving the factory, and customers do not need to bind again.


- RF接口
Install the antenna to the RF interface.
- Ground interface
- J30J interface
Connect the provided ground end cable to the J30J-37 pin interface to realize power supply, 图像传输, data transmission and remote control functions.
- USB接口
USB Type-C interface, connect this interface to the ground station through a USB data cable, and run the wireless video link device management client.
- LED status indicator
The LED light is always on, indicating that the uplink is connected, and very bright, indicating that the uplink is not connected normally (this function is invalid for the air terminal). The positions shown in the figure, 从左到右, are the power indicator (1), the Ethernet connection indicator (2~4), and the uplink and downlink status indicators (5~6).
- bind button
Long press the button to put the device into binding state. The device has been bound before leaving the factory, and customers do not need to bind again.
- RF接口
Install the antenna to the RF interface.
- Installation Notes
- Air system installation
- antenna installation
- Air system installation
- Air end module


Install the antennas of the air unit to the RF ports respectively.
注意:
- To avoid damage to the module, please install the antenna before powering on.
- When the air end is integrated on the drone, please avoid the installation position of the antenna being blocked by the drone components.
- Please ensure that the antenna connector is perpendicular to the module when the antenna is installed.
- power connection


Insert the cable into the J30J connector on the air end, and connect the other end to the battery or other power output ports of the drone. 24V DC is recommended.
注意:
- To avoid damage to the module, please install the antenna before powering on.
- Power supply recommendation:DC24V/1.2A (或6S锂电池)。
- connect camera


Connect the camera’s network port video output interface to the module’s air port network port.
- Connect flight controller (remote control and data transmission)


Data transmission connection: The 6PIN interface is connected to the serial port (UART) of the air terminal module, and the other end is connected to the data transmission interface of the flight controller. The digital baud rate is configurable.
Remote control connection: The 6PIN interface is connected to the remote control interface of the air terminal module, and the other end is connected to the remote control interface of the flight controller. Support PPM and S.bus protocols.
注意:
- Different versions of flight controllers may have different interface types, and corresponding cables need to be used.
- Ground end module installation
- antenna installation
Correctly connect the ground end antenna to the RF interface through the RF connection cable to ensure that the interface is tightly installed.
注意:
- To avoid damage to the module, please install the antenna correctly before powering on.
- Make sure the antenna is perpendicular to the module, and tighten the connectors at both ends of the connecting cable, but not too tight to avoid damaging the antenna.
- When the module is working, the antenna needs to be perpendicular to the module.
- power supply installation
Connect to the power interface on the ground end, and connect the battery or other power input devices to the other end. It is recommended to use 24V DC, 6S lithium battery.
注意:
- To avoid damage to the module, please install the antenna before powering on.
- It is recommended to use 24V DC, 6S lithium battery for power supply.
- Digital connection


Connect the serial port of the ground end, and connect the other end to the ground station with USB, which can realize the data transmission communication function between the ground end module and the ground station.
注意:
- Please confirm that the ground station baud rate and image transmission baud rate are configured correctly.
- Please confirm that the wire sequence of the data transmission cable matches the interface definition of the wireless video link module.
- Connect the remote


Use the PPM protocol: the 6PIN interface is connected to the remote control interface of the ground terminal, and the other end is connected to the trainer interface of the remote control, and the remote control inputs the remote control signal to the ground terminal module.
Use the S.BUS protocol: the 6PIN interface is connected to the remote control interface on the ground side, and the other end is connected to the S.BUS receiver, and the S.BUS receiver communicates with the remote control wirelessly.
注意:
- Please make sure that the remote controller is set to trainer mode and the corresponding PPM or S.BUS working mode.
- The line sequence matches the interface definition of the wireless video link module.
- If the S.BUS receiver is used, the working frequency of the receiver and the wireless video link module must have a certain degree of isolation. 例如, a 2.4G remote control cannot be used with a 2.4G wireless video link device at the same time.
- Create video output


The ground terminal outputs video to the ground station or notebook through the network port.
注意:
- Please make sure that the IP address of the ground station or notebook is configured correctly, and the network cable is connected correctly.
- System Diagram


- Connect the antenna to the RF interface of the air end module.
- Connect the video output interface of the camera’s network port to the network port of the air system.
- Connect the remote control interface of the air terminal module to the remote control interface of the flight controller.
- Connect the data transmission interface of the flight controller to the data transmission serial port of the air terminal module.
- Turn on the camera power switch and set parameters such as video format.
- Connect the 24V DC power supply to the power interface of the air unit module, and turn on the power switch.
- If you need the latest version of firmware, connect the air terminal module and PC or notebook through a USB cable, and use the wireless video link management software to upgrade the firmware。


- Connect the antenna to the RF interface of the ground end module.
- Adjust the remote control to trainer mode, if using PPM mode, connect the remote control interface of the ground terminal to the trainer port of the remote control; if using the S.BUS protocol, you need to use the S.BUS receiver to establish a wired connection with the ground terminal, to establish a connection.
- The PC or laptop is connected to the data transmission interface on the ground side through a TTL-USB cable to establish data transmission communication.
- If you want to watch the video on a PC or laptop, you need to connect to the video output interface of the network port on the ground side through a network cable.
- Connect the 24V DC power supply to the power supply interface of the ground terminal, and turn on the power switch.
- If you need the latest version of firmware, connect the ground terminal module and PC or notebook through a USB cable, and use the wireless video link management software to upgrade the firmware.
- management software
- Web UI management device
In addition to using the client, you can also manage the device through the webpage, connect the ground end and air end devices directly to the computer through the network cable, and configure the computer IP as 192.168. Access to ground and air terminals.
On the Status-Baseband status page, you can view detailed information such as signal strength, signal-to-noise ratio, 发射功率, downlink traffic, and data transmission and reception.


On the Status-Device information page, you can view the device serial number and device software version information.


On the Config-Net settings page, you can configure the device’s own IP address, data transfer destination IP address and port. 例如: Mavlink host IP is set to 192.168.199.33, Mavlink UDP port (Mavlink UDP port corresponds to the first physical serial port, Mavlink UDP port ext corresponds to the second physical serial port) 被设定为 14550, then the IP address of the ground station needs to be set to 192.168 .199.33, UDP listening port is set to 14550.


On the Config-Radio settings page, you can set frequency hopping, frequency point, and antenna selection.


The device can be bound on the Config-Bind settings page.


On the Config-System settings page, you can set the serial port baud rate, downlink MCS, ground end role, factory reset, 等等. U1 baudrate and U2 baudrate respectively represent the baud rate of the first and second serial ports. QAM Mode supports adaptive mode, 那是, the device automatically and dynamically adjusts the downlink mode according to the real-time wireless link quality.


On the Upload-upload page, you can upgrade the device firmware.


- Use Cases
- remote control function
The remote control function can choose PPM and S.BUS protocol for communication. If you use the PPM protocol, please use the wireless video link standard remote control cable to connect the ground terminal and the remote control trainer port. If the S.BUS protocol is used, an additional S.BUS-supporting receiver is required. The ground terminal is connected to the S.BUS receiver, and the S.BUS receiver establishes wireless communication with the remote controller. In both modes of use, the corresponding mode needs to be configured on the remote control. If you use an S.BUS receiver, please use a receiver whose working frequency is different from that of the video transmission module.
When using PPM mode, the air terminal module needs to be connected to the PPM RC interface of the flight controller (Pixhawk4).
When using S.BUS mode, the air terminal module needs to be connected to the DSM/S.BUS RC interface of the flight controller (Pixhawk4).
- Frisky(FRSKY)remote control configuration
- PPM mode
The mode of the Model setup major item – Trainer sub-item is adjusted to Slave/Jack.
It is necessary to adjust the mode of the Model setup major item – Internal RF sub-item to OFF, and turn off the S.BUS mode.


- S.BUS mode
The Model setup major item – Internal RF sub-item can be adjusted to LR12, D8, D16, 关闭. OFF means to close the S.BUS mode.
Select LR12, D8, D16 options according to the type of receiver.


- Futaba remote control configuration
- S.BUS mode
The mode of the Linkage menu item – system sub-item can be adjusted to FASSTest-14CH, FASSTest 12CH, FASST MULTI, FASST 7CH, S-FHSS. Different mode settings are made according to the receiver type.


- PPM mode
Use the wireless video link standard trainer line to connect with futaba’s trainer line (one end is connected to futaba’s trainer port, and the other end is a 3.5mm connector), and the PPM mode can be used directly without additional configuration.
- Digital connection
The data transmission serial port of the air end module is connected to the TELEM1 port of the Pixhawk4 flight controller.
- 预防措施
- link performance
- 2.4GHz WiFi interference
The working frequency of WiFi is 2.4GHz, and the working bandwidth is 20MHz and 40MHz. WiFi will cause same-frequency or adjacent-frequency interference to the 2.4GHz wireless link of the drone. Even if there is no WiFi router nearby for the WiFi device to connect to, the WiFi device will periodically send a beacon/probe signal. 因此, when you use the 2.4GHz wireless link to operate the drone in the field, you need to turn off the WiFi device (such as a modem, hotspot, 等等) of the mobile phone or laptop. If the ground station needs to use a WiFi relay, it is recommended to use a 5.8GHz WiFI modem.
- Bluetooth interference
Bluetooth works in frequency hopping mode at 2.4GHz. Any Bluetooth device (such as Bluetooth mouse, Bluetooth joystick, car remote control key, 等等) in working condition and close to the ground station will interfere with the downlink products. Please avoid using Bluetooth devices when operating the drone with a 2.4GHz wireless link.
- Wireless Device Coexistence Interference
If another wireless device works on a frequency close to 2.4GHz, when this device is close to the 2.4GHz module of the drone, it will interfere with the wireless link of the drone. 例如, some drones use both LTE links and point-to-point communication links. 尤其是, it is important to note that LTE operating on the 2.3GHz frequency may also cause problems.
- HDMI interference
When the HDMI source/cable is close to the antenna of the 2.4GHz wireless device, the HDMI source/video will interfere with the 2.4GHz wireless signal (including WiFi).
http://www.dslreports.com/forum/r27141612-HDMI-connect-interferes-with-wifi
It is recommended to install the antenna at least 24cm away from the HDMI source/cable. Using a good shielded HDMI cable is also a solution. The following shielded HDMI cables use 360-degree shielded terminations, which is recommended.
http://www.l-com.com/content/Article.aspx?Type=P&ID=10699
http://www.l-com.com/audio-video-micro-hdmi-to-hdmi-cables
http://www.l-com.com/audio-video-hdmi-female-to-micro-hdmi-male-adapter
- EMI of USB3.0 extender and splitter (HUB)
USB3.0 extender or splitter will cause EMI to the device, please check whether there is EMI when using USB3.0 extender to avoid interference to wireless devices.
- RF cable connection and antenna connection inspection
Before flying, check if the antenna is connected to the module. Using the module without the antenna connected will result in extremely short distances and may damage the module. It is recommended to check the connections of all RF connectors. Loose connections can significantly reduce distance.
- antenna installation
The placement of two antennas in the air ensures that no matter what the position of the drone, at least one antenna will not be blocked by the ground station payload. When installing the air end antenna, make it close to the vertical ground when the drone is moving.
- battery power
If the battery powering the module is low, transmit and receive performance will degrade, even though the battery may still be powering the module.
- Remote control channel and remote control
The remote control channel of the wireless video link module supports PPM and S.BUS protocols. If you use the PPM protocol, you need to configure the remote control to PPM mode and turn off the wireless transmission of the remote control. If the S.BUS protocol is used, the wireless operating frequency of the receiver and the remote control must be in a different frequency band from the operating frequency of the wireless video link module, and a certain degree of isolation must be guaranteed.
If you do not use the remote control channel of the wireless video link module, but use the remote control link that comes with the remote control, you must pay attention to the working frequency of the remote control link of the remote control. If the working frequency of the wireless video link module is in the same frequency band, it will interfere with each other.
When using it, it is necessary to avoid the interference of the wireless link of the remote control or the receiver on the wireless video link module.
- frequency selection
After the device is connected normally, open the wireless video link management software and click the “Frequency” button.


On the left side, you can observe the RSSI curve of the 2.4G WIFI frequency band scanning results.
The lower the RSSI value corresponding to the frequency point, the smaller the interference of the corresponding frequency point.
In order to ensure the best working performance, please select the frequency point with the least interference as the working frequency point.


The working mode provides two modes manual and automatic.


Manual mode: The user can manually configure the working frequency.
Automatic mode: After the device is turned on, it selects the working frequency according to the frequency scanning results.
Please use manual mode for manual frequency point configuration.


Use the channel selection function to configure the desired operating frequency.
- 固件升级
Upgrade files: Air-end FPGA, Ground-end FPGA, Air-end MCU1 program, Ground-end MCU1 program, Air-end MCU2 program, Ground-end MCU2 program.
All files are updated using management software. Do not disconnect the power supply during the upgrade process, and ensure the normal connection of the USB cable. If the upgrade fails, do not disconnect the power or restart the device, please try to upgrade again directly. 除此以外, it will be necessary to return to the factory and use a special burning tool for firmware burning.
- Device binding operation
Binding is the method used to pair the air-end and ground-end devices.
Air end and ground end binding process:
- Both the air end and ground end modules are powered on.
- First press the binding button (physical binding button, not the button on the software interface) of the air system module for more than 5 秒. The LED light (绿色) next to the binding button will flash, indicating that it is in the binding state.
- Then press the binding button (physical binding button, not the button on the software interface) of the ground module for more than 5 秒. The LED light (绿色) of the ground end will flash, indicating that it is in the binding state.
- After the link indicators of the air end and the ground end are always on, it indicates that the binding state has been entered, and the two end devices are powered off.
- Turn on the dual-terminal power supply, and the link indicator lights normally, indicating that the air terminal and the ground terminal have been connected normally. Bonded will also be displayed on the management software, indicating that the binding is successful. If Unbinded is displayed, it means that the binding failed.
注意:
- If devices with different firmware versions are bound, the binding may fail.
- If the programs of the air unit and the ground unit are programmed incorrectly, 例如, the air unit is programmed as the ground unit, and the wrong air unit and the ground unit are bound to each other, the binding will fail.
- The device has been bound before leaving the factory, and customers do not need to bind it again after unpacking.
- If the device is restored to factory settings, it needs to be re-bound.
- Computer Windows Firewall
Make sure that the firewall on the computer is closed to prevent data transmission or video data from being intercepted. Taking the Win10 system as an example, the steps to disable the firewall are as follows:
control Panel🡪system and security🡪Windows firewall🡪custom settings
Select “Close Windows Firewall” for private network settings/public network settings, and click “OK”.


- Computer IP address setting
When using a computer to watch videos, you need to set the IP address of the computer accordingly. Taking the HDMI ground terminal usage scenario as an example, the computer IP address needs to be set to 192.168.199.33.
The Win10 operating system setting path is as follows: Control Panel\Network and Internet\Network Connections, double-click “Ethernet”,


Double-click “Internet Protocol Version 4 (TCP/Ipv4)”,


Set the IP address and subnet mask as follows, and click “OK” to complete the setting.


- J30J-37 interface definition
| 名称 | 销 |
| 功率 | 1,2,20 |
| GND | 3,10,15,21,22,29,31 |
| Ethernet1 TX+ | 7 |
| Ethernet1 TX- | 26 |
| Ethernet1 RX+ | 6 |
| Ethernet1 RX- | 25 |
| Ethernet2 TX+ | 5 |
| Ethernet2 TX- | 24 |
| Ethernet2 RX+ | 4 |
| Ethernet2 RX- | 23 |
| Ethernet3 TX+ | 8 |
| Ethernet3 TX- | 27 |
| Ethernet3 RX+ | 9 |
| Ethernet3 RX- | 28 |
| SBUS_V | 11 |
| 百万分率 | 12 |
| GPS_SYNC | 13 |
| Reserved | 14 |
| 232TX1 or 422Y2 | 16 |
| 232RX1 or 422A2 | 17 |
| 232TX2 or 422Y1 | 18 |
| 232RX2 or 422A1 | 19 |
| SBUS1 | 30 |
| SBUS2 | 32 |
| Reserved | 33 |
| 422Z2 or TTLTX1 | 34 |
| 422B2 or TTLRX1 | 35 |
| 422Z1 or TTLTX2 | 36 |
| 422B1 or TTLRX2 | 37 |
- common problem
题 1: 无线视频链路模块如何供电?
Module power supply range: 直流18-26V.
题 2: Can the wireless video link module be powered on first and then install the antenna?
通电前必须安装天线.
题 3: How many antennas are installed on the wireless video link air terminal?
Two antennas need to be installed on the air terminal.
题 4: How many antennas are installed on the wireless video link ground terminal?
Two antennas need to be installed on the ground end.
题 5: 不同型号的遥控器可以控制飞行器吗?
是, 只需通过训练器端口输出标准PPM信号; or use the S.BUS receiver for communication.
题 6: Can two air units be installed on one aircraft?
没有, a plane can only have one air unit.
题 7: Can two ground terminals be installed at the receiving end?
Point-to-point devices can only install one ground terminal; point-to-multipoint devices support multiple ground terminals.
题 8: 安装无线视频联航端模块后, GPS 无法搜索卫星, 我应该怎么办?
Please check whether the antenna of the device is far away from the GPS to avoid blocking interference to the GPS. 1. The frequency band of 4G equipment is close to the GPS frequency band, 所以必须保证一定程度的天线隔离度.
题 9: 如果 6 LED lights of the ground end module are on or off?
LED1 (电源指示灯): 接通电源后, 灯总是蓝色的.
LED2~4个 (网络连接指示灯): 如果灯一直亮着, 表示该网口物理链路已连通, and if the light is off, 表示网口物理链路未连接.
LED5 (上行链路指示器): 灯亮时, 表明地面单元和空中单元之间的链接已经建立; when the light is off, 表示地面机与空中机的链路已断开.
LED6 (下行指示灯): 灯亮时, 表示空中单位与地面单位的链接已建立; when the light is off, 表示天空端与地面端的链路已断开.
题 10: 地面端上行状态指示灯不亮怎么办?
请按照以下步骤操作:
1) 请检查主机端和地面端模块供电是否正常;
2) 请检查机载端与地面端是否绑定成功;
3) 请检查航空端子和接地端子模块的天线安装是否正常: 天线安装位置是否有障碍物; 天线接口是否松动; 送料器是否未拧紧, 以及接口是否松动;
4) 使用管理软件检查地面端发射频率与空中端接收频率是否一致;
5) 如果以上操作都不能解决问题, please contact wireless video link technical support personnel.
题 11: 地面端下行状态指示灯不亮怎么办?
请按照以下步骤操作:
1) 请检查主机端和地面端模块供电是否正常;
2) 请检查机载端与地面端是否绑定成功;
3) 请检查航空端子和接地端子模块的天线安装是否正常: 天线安装位置是否有障碍物; 天线接口是否松动; 送料器是否未拧紧, 以及接口是否松动;
4) 使用管理软件检查空中终端的发射频率与地面终端的接收频率是否一致;
5) 如果以上操作都不能解决问题, please contact wireless video link technical support personnel.
题 12: ETH地面端网络物理连接指示灯不亮怎么办?
请按照以下步骤操作:
1) Please check whether the power supply of the air end and ground end modules is normal and whether the modules start normally;
2) 请检查网线是否连接正常;
3) 请检查网络摄像机是否正常供电;
4) 如果以上操作都不能解决问题, please contact wireless video link technical support personnel.
题 13: 连接无线视频联动设备后, 数据传输无法正常连接?
请按照以下步骤操作:
1) 确认无线链接状态是否正常建立;
2) Please check whether the connection between the flight controller and the air terminal is correct and whether the connection between the ground terminal and the ground station is correct;
3) 请检查机载端和地面端模块数据传输线序是否正常. 我公司提供标准电缆. 如果您自己接线, 请检查线路顺序;
4) 通过管理软件检查数据传输波特率是否与飞控一致;
5) 地面站电脑防火墙是否关闭;
6) 如果以上操作都不能解决问题, please contact wireless video link technical support personnel.
题 14: 连接无线视频联动设备后, 遥控器无法正常连接.
请按照以下步骤操作:
1) 确认无线链接状态是否正常建立;
2) Please check whether the connection between the flight controller and the air terminal is correct and whether the connection between the ground terminal and the remote control is correct;
3) 如果使用 PPM 模式, 请检查遥控器的模式配置; 如果使用S.BUS模式, 请检查接收器和遥控器配置;
4) 请检查机载端和地面端模块的遥控线序是否正确;
5) 通过管理软件检查远程控制模式是否配置正确;
6) 如果以上操作都不能解决问题, please contact wireless video link technical support personnel.
题 15:连接无线视频联动设备后, 无法显示图像?
请按照以下步骤操作:
1) 确认无线链接状态是否正常建立;
2) 确认空中端子、接地端子网络物理连接指示灯是否正常;
3) 如果使用网络摄像机, 请确认网络摄像机的IP地址, 登录用户名和密码;
4) 地面站电脑和网络摄像机的IP地址配置是否在同一网段;
5) 播放RTSP的视频流地址配置是否正确;
6) 地面站电脑防火墙是否关闭;
7) 如果以上操作都不能解决问题, please contact wireless video link technical support personnel.
题 16: 连接无线视频联动设备后, 图像卡顿或有马赛克现象?
1) 确认下行模式配置是否合理;
2) 使用的网线是否连接正确;
3) 下行是否有干扰, 考虑改变工作频点;
4) 如果没有干扰的话, 是否达到通讯链路的极限距离;
5) 观察Pod下行速率是否波动过大. 例如, Pod 的固定比特率为 3 Mbps的, 客户端下行速率设置为 3.97 Mbps的, 并且 Pod 的比特率峰值很可能在某个阶段,如果超过 3.97 Mbps的, 此时会有卡顿或马赛克现象. 设置客户端下行速率为 5.27 Mbps的, 并验证下行速率是否超过 3.97 Mbps的. 如果超过 3.97 Mbps的, 设置客户端下行速率大于Pod峰值;
6) 查看客户端实时下行速率, 是否有双机码流;
7) 如果以上操作都不能解决问题, please contact wireless video link technical support personnel.
题 17: 使用无线视频链接设备, 通讯距离短, 不符合预期?
1) 确认天线、连接线安装是否正确,是否为无线视频链路标准材料;
2) 确保接闪器天线安装不会被负载遮挡, 接地端子天线近距离内无明显遮挡物, 空中端子和接地端子的天线与地面垂直;
3) Check whether the video transmission equipment hardware such as power amplifier is damaged;
4) 下行模式配置值是否不合理, 而高速下行模式将大幅缩短通讯距离;
5) 工作频率是否受到明显干扰, 您可以通过客户端选择最佳频率;
6) 飞行环境中空中航站楼和地面航站楼是否被严重遮挡, 复杂的地理环境会影响通讯距离;
7) 如果以上操作都不能解决问题, please contact wireless video link technical support personnel.